 |
| New Features |
| 1. Overtime Approval Worksheet Report Enhancement |
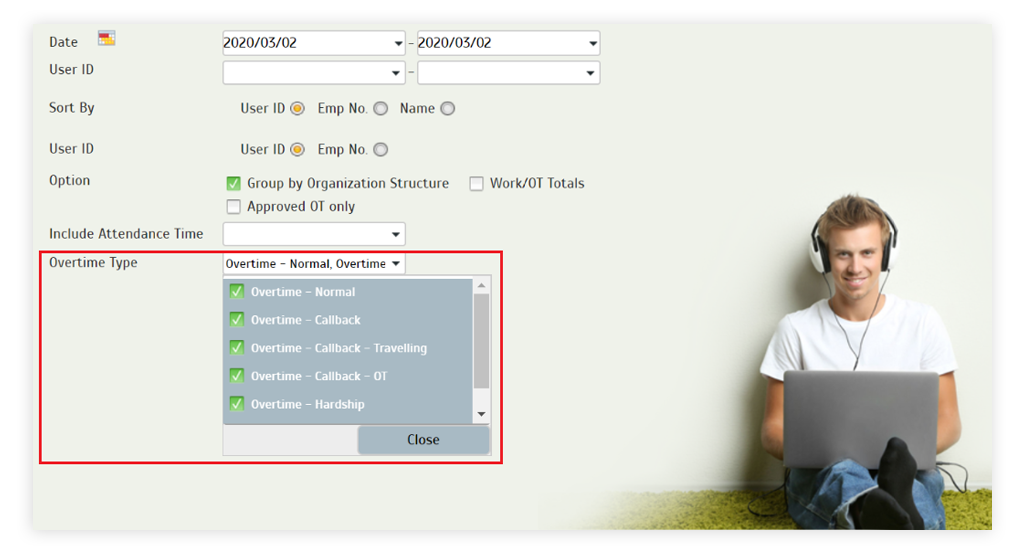
| Firstly, we have an update for the Overtime Approval Worksheet Report. This report has already been updated once during February followed by the introduction of an Overtime Type field for users’ Overtime requests. If Admin sets different values (e.g. Public Holiday, Weekend Overtime, Company Events, etc.) in this field, Employees can select the appropriate Overtime Type in their applications. During the report generation, you can then choose the Overtime Type to filter the records. We have just improved this filter to allow multiple selection. |
| i. To use Overtime Type, no additional setting is required at ‘Manage Approval Rules’. ii. To manage Overtime Type, go to Company > Profile Field > Manage Data Field > Default Data Fields table. iii. Select the Edit button for Overtime Type. iv. By default, ‘Normal’ Overtime Type is already available in the system. v. Click on ‘+ Add More’ to add new types based on your requirements. vi. Once this is updated, the new types will be provided for users’ selection in the Overtime request form. vii. Additionally, other improvements in the Overtime form include an option to select Attendance Date & Shift and the display of Attendance Details. Furthermore, the system has also now been updated to allow multiple OT requests for users who have only one Shift. |
| a. Allow Multiple Selection of Overtime Type |
 |
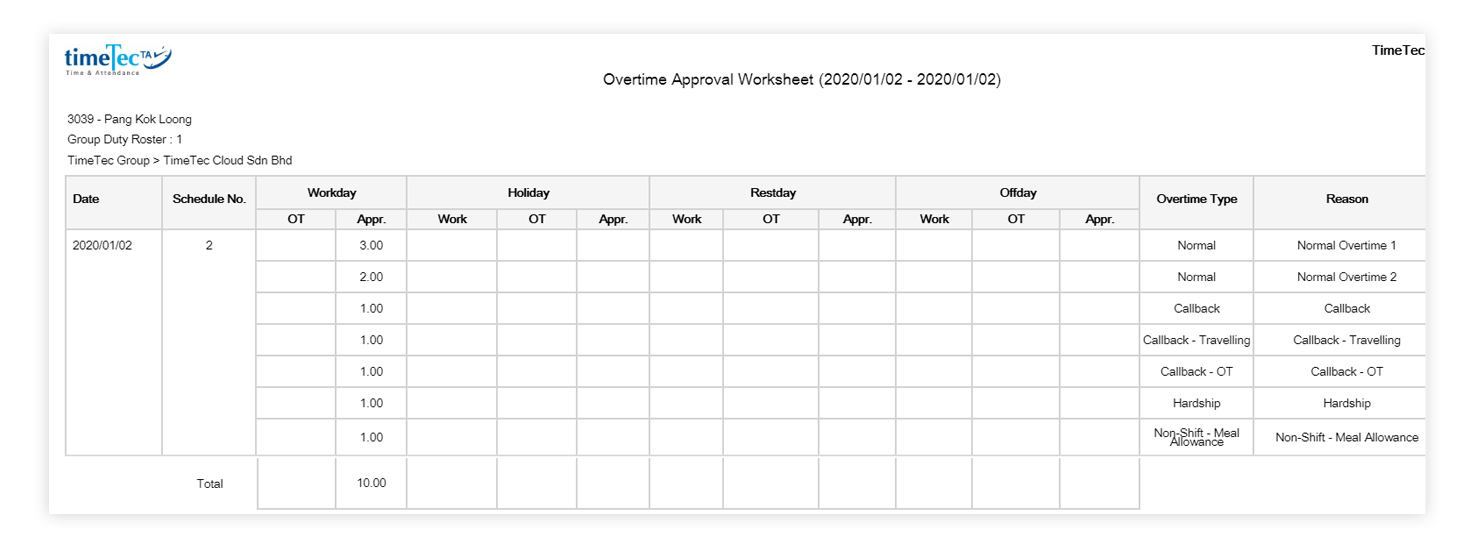
| b. Overtime Approval Worksheet Report |
 |
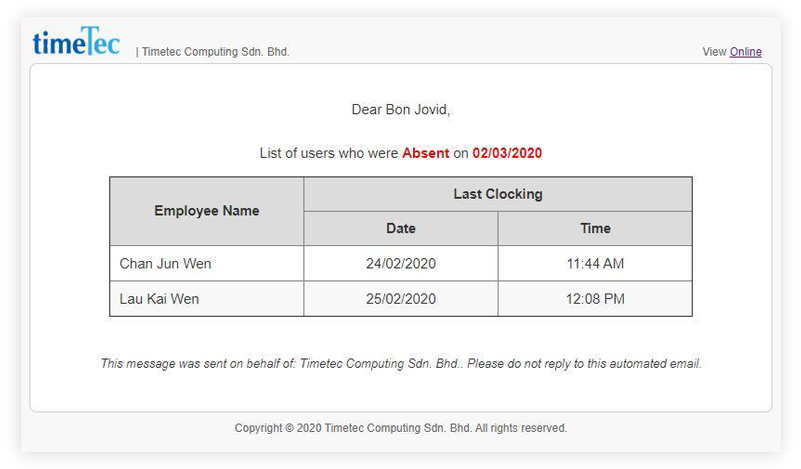
| 2. Update Styling in Attendance Notification Email |
| If you are using the Attendance Monitoring function (Attendance Monitoring/ Tardiness Monitoring) in the application, you will receive email and mobile app notifications based on your preset monitoring criteria. Mobile app notifications go out by default but email notification will depend on your account’s system settings (System Settings > Time & Attendance > Approval Notification Email). This March, we have made some formatting changes to the previous email template to ensure the latest will be easier to read and highlight key information. The list is as follows: |
| i. Tardiness keyword and date are bold and red in colour. ii. Table header is centre-aligned, bold and with larger font size than the data. iii. Data from the ‘Employee Name’ column is left-aligned. iv. Data of the other columns are centre-aligned. v. Description at the footer is italic. vi. Colour of Table header and row separator changed. |
 |
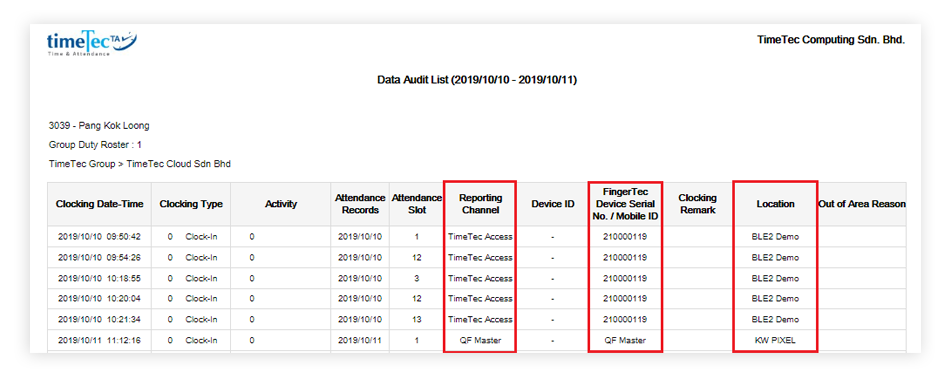
| 3. Data Audit List Report Enhancement |
| This next enhancement is on the Data Audit List Report. To improve relevance, clarity and presentation, we have: |
| i. Revamped the report’s layout and design. ii. Included ‘TimeTec Access’ and ‘QF Master’ in the ‘Reporting Channel’. |
| Last October, we rolled out a data integration feature which enables the syncing of access logs from TimeTec Access into TimeTec TA for attendance report and analysis. These records are then identified as reported via TimeTec Access/ QF Master on the TA’s dashboard and the Data Audit List. Within the Data Audit List Report, you can now view the relevant information in the columns for ‘Reporting Channel’, ‘Fingertec Device Serial No./ Mobile ID’ and ‘Location’. |
 |
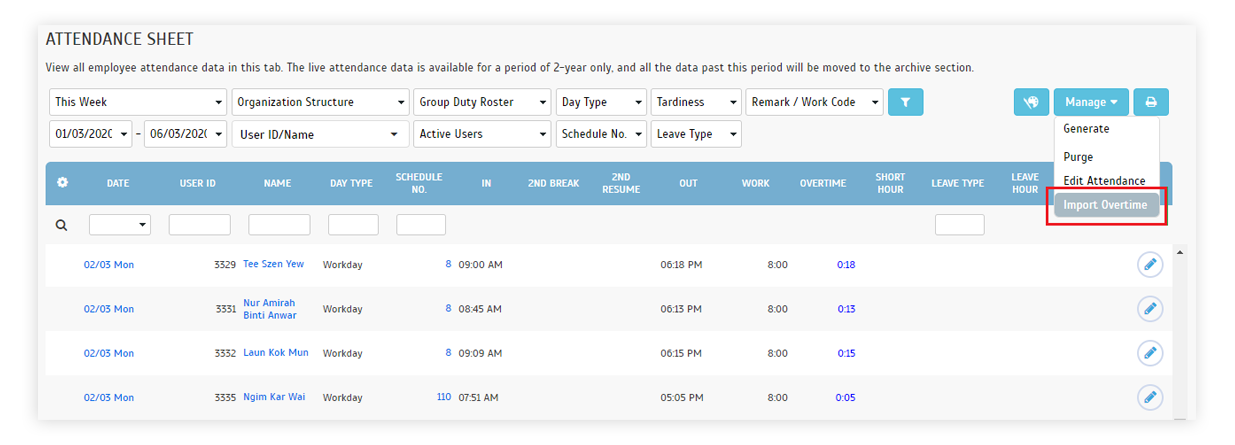
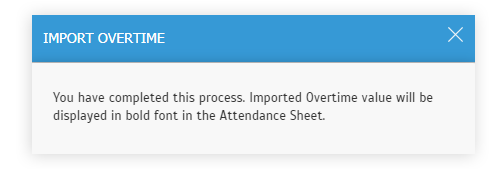
| 4. New Import Overtime Function in Attendance Sheet |
| We know it’s important to maintain proper records of all Overtime Hours in the system, as it is mainly used for payroll calculations. For Admins, if you ever need to manually input/rectify the OT Hours computed in the Attendance Sheet, you can always click Edit for a particular user to make particular changes. However, if it involves more than one user/ days/ both, you might want to consider saving some time by using the new ‘Import Overtime’ function that we’ve just implemented here. |
| i. At the Attendance Sheet page, click Manage > Import Overtime. ii. Download the sample excel file to use as a template for import. iii. Fill in the OT details and upload the file. |
| a. Attendance Sheet – Added ‘Import Overtime’ Button |
 |
| b. Import Overtime popup - Download Sample & Upload |
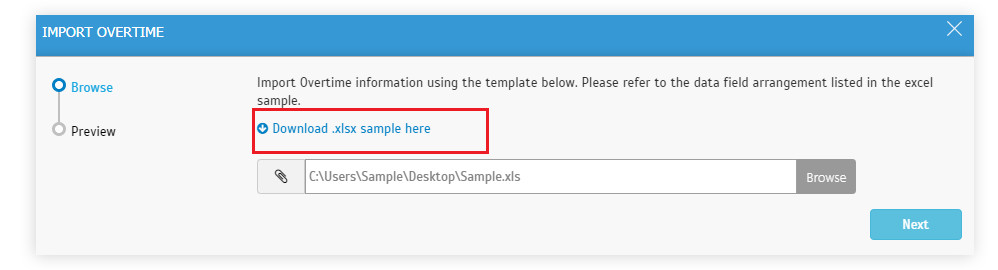 |
| c. Import Overtime Sample.xlsx |
 |
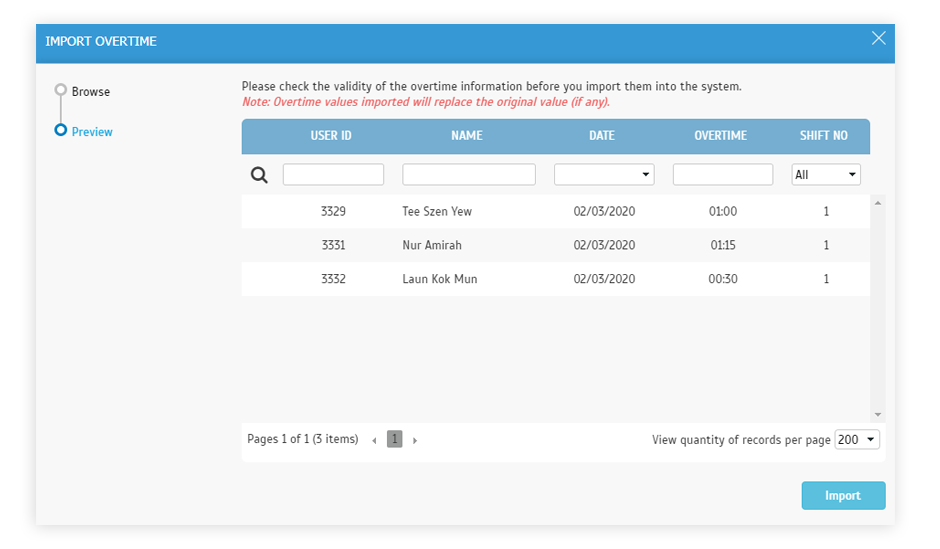
| d. Import Overtime - Preview after Upload |
 |
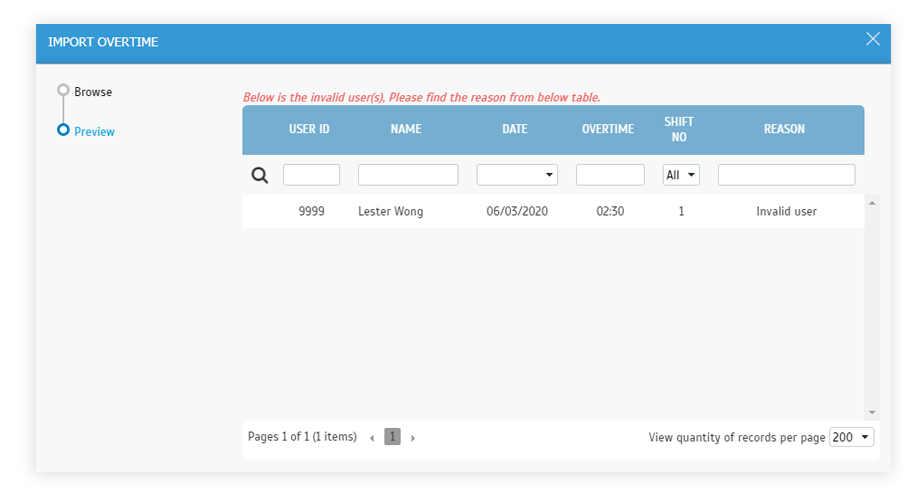
| e. Import Overtime - Invalid Data |
 |
| f. Import Overtime Successful popup |
 |
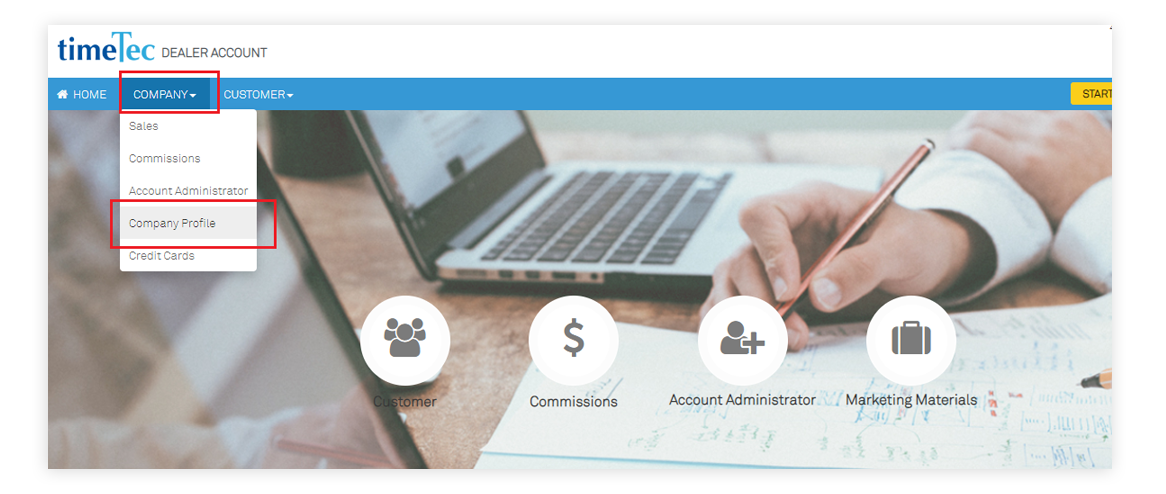
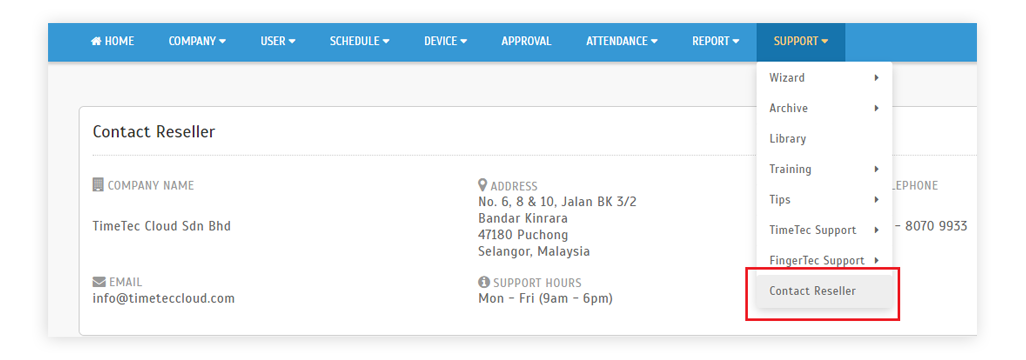
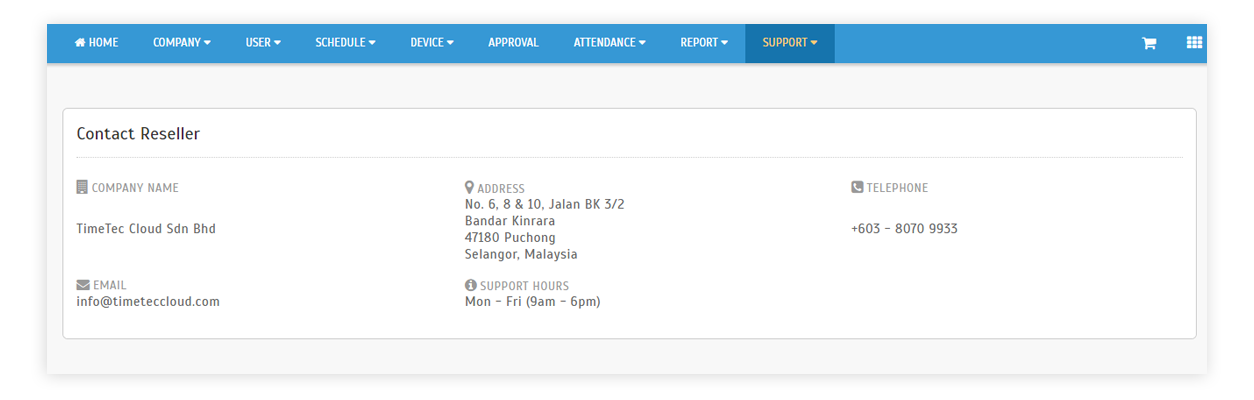
| 5. Added ‘Contact Reseller’ at the Support Menu – Display Reseller Information |
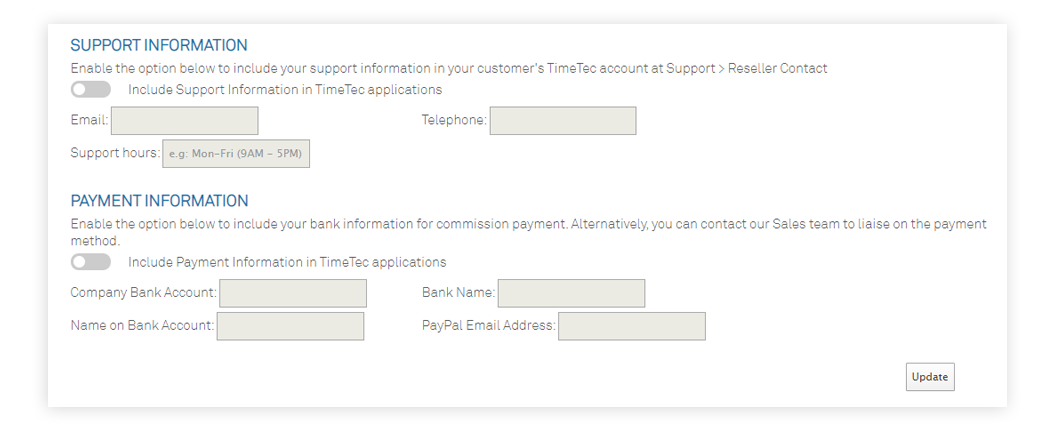
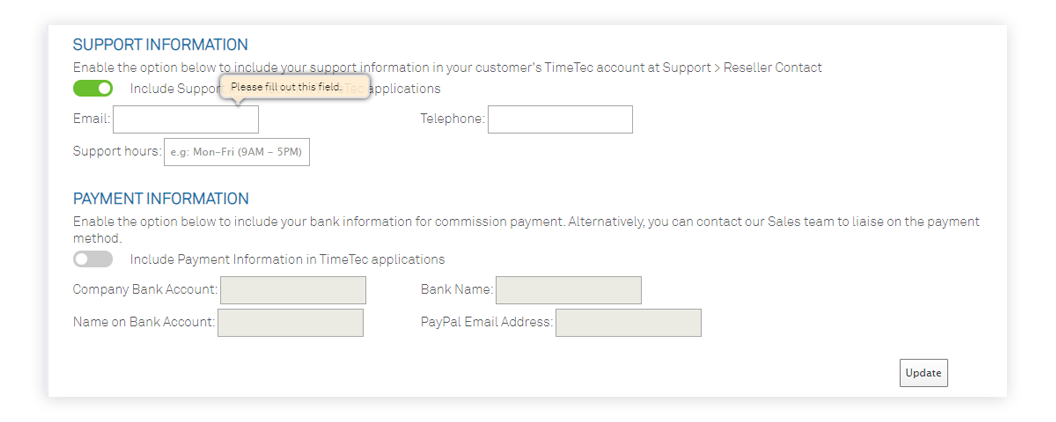
| Next, we have added a ‘Contact Reseller’ button in TimeTec TA > Support tab. You can click this to view the reseller’s support team information. However, please note that the ‘Contact Reseller’ will be available in the customer's account only if the TimeTec Reseller has enabled this function. For resellers, go to Company Profile > Support Information > Enable and submit the relevant details. |
| Dealer Account Login |
| a. Company > Company Profile |
 |
| b. Added Support Information Section Enable the option (toggle button) to include your support information in the customer's TimeTec account at Support > Contact Reseller. |
 |
 |
| Subscriber Account Login |
| a. Support > Contact Reseller |
 |
 |
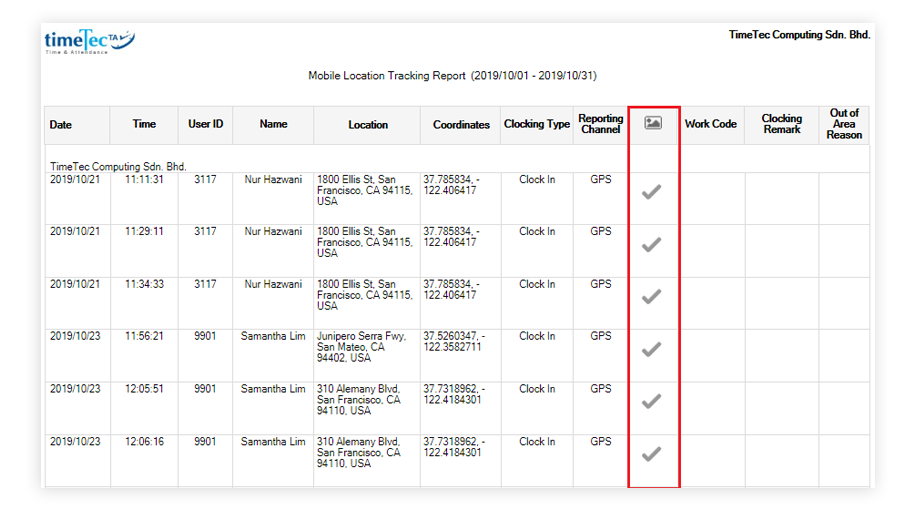
| 6. Mobile Location Tracking Report Enhancement |
| In the Mobile Location Tracking Report, we’ve added a new Photo column. You will see a checkmark symbol if users have attached a photo for the clocking record. To view the photo, Admins can go to Device > Data Audit List. |
| a. Added New Column for Clocking Photo Indication |
 |
| TimeTec Profile Updates |
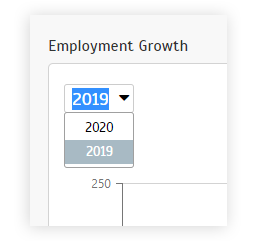
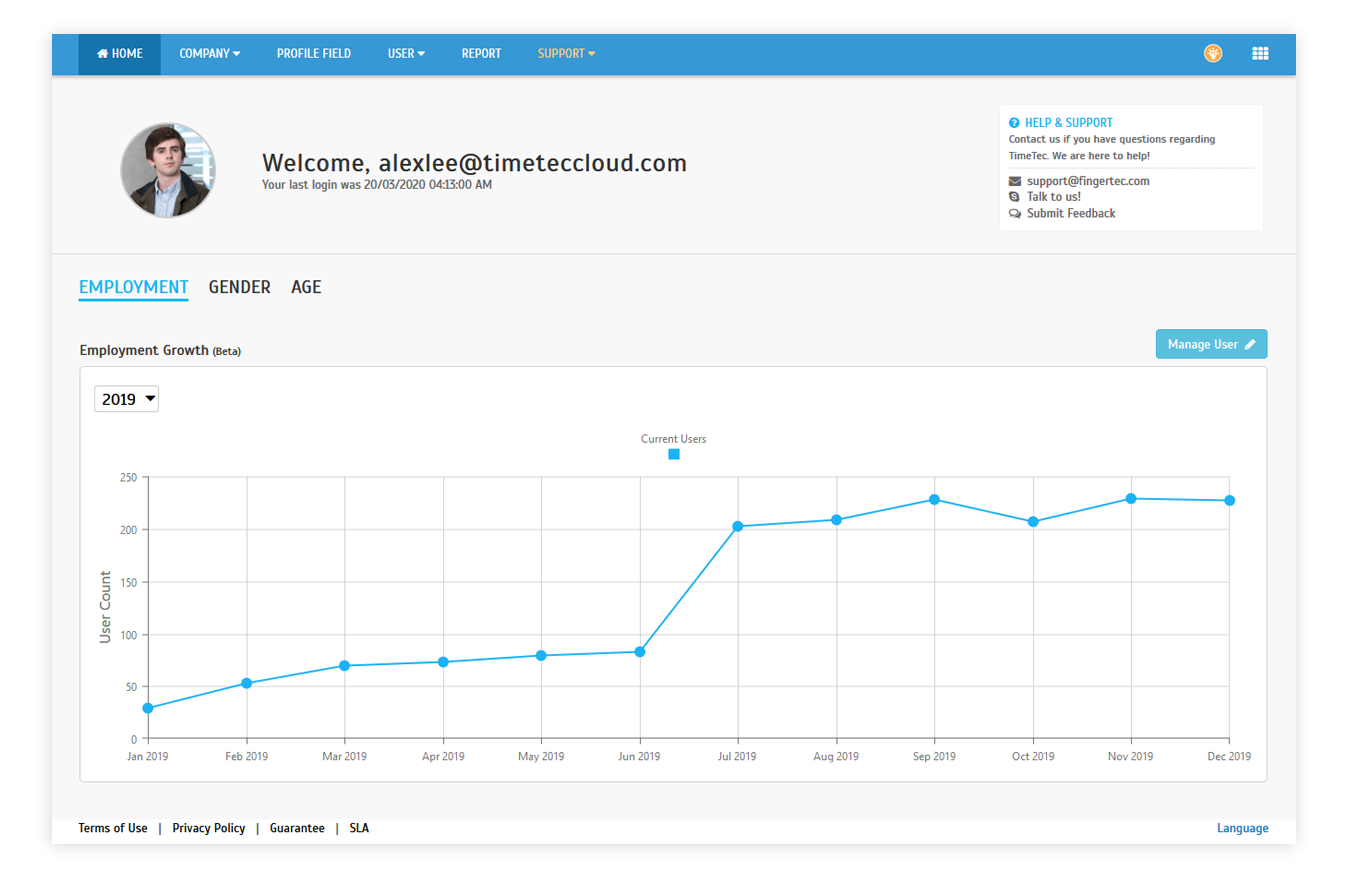
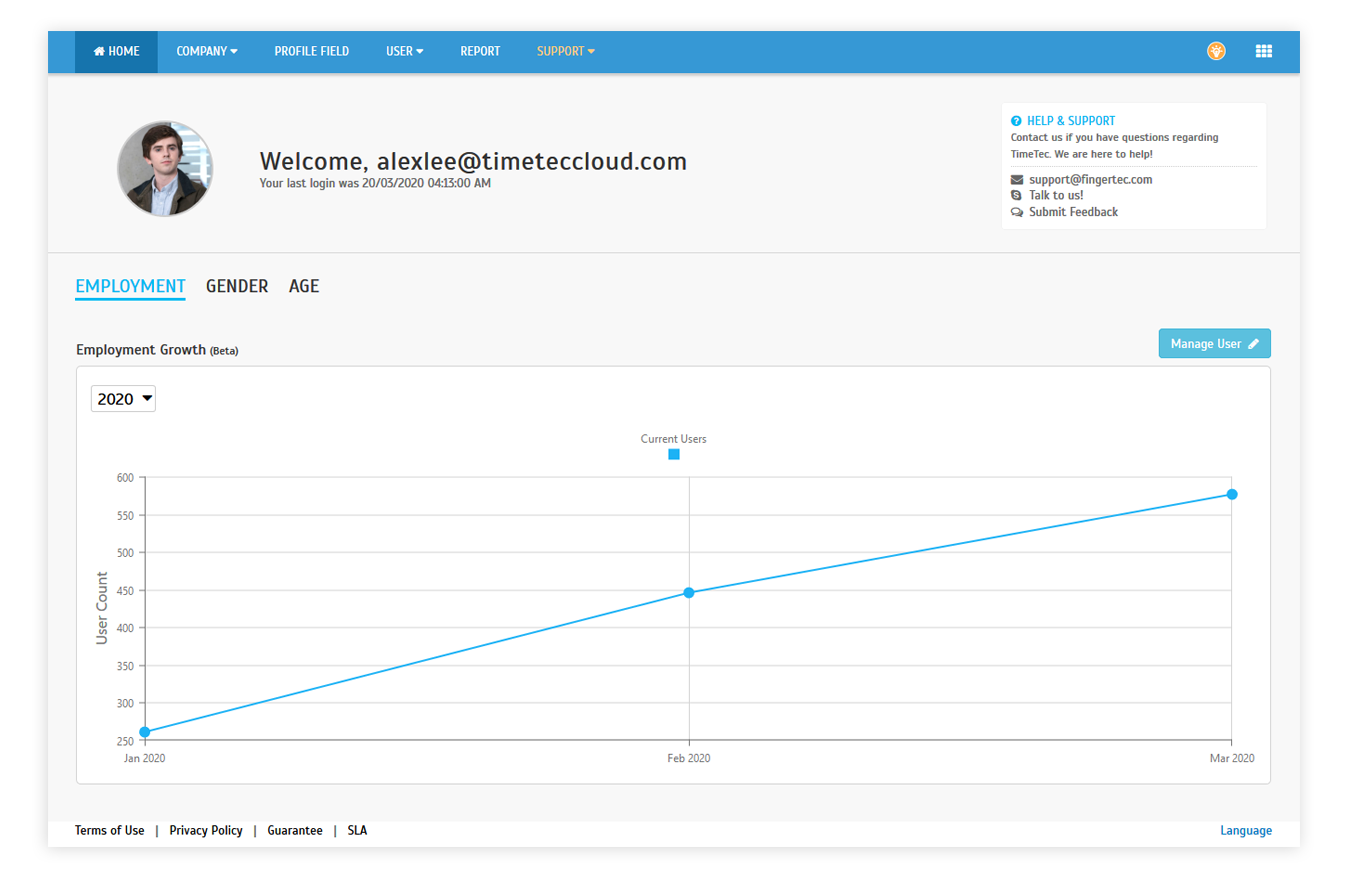
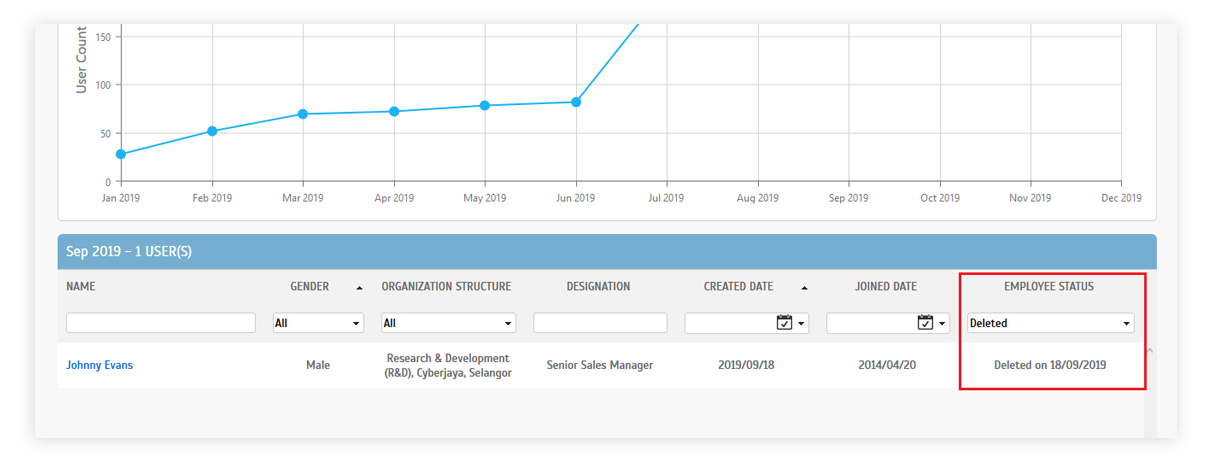
| 1. Admin Dashboard- New Employment Growth Report |
| Whenever you need a quick look back at your company’s overall employee count and turnover, you can make use of the new Employment Growth Chart on the TimeTec Profile’s Dashboard. This is a line chart that illustrates the monthly employment growth/change throughout a selected calendar year. To view the required information, choose either Year 2019 or 2020 from the graph. Next, click on the line chart’s data point/ marker for any month to display a table with users list of that particular month. Refer to the sample screenshots below for further details: |
| a. TimeTec Profile Admin Dashboard - Employment Growth Chart |
 |
 |
 |
| b. Tool-tips with Total Active, Added & Deleted Users |
 |
| c. User Listing for the Month will display if the Admin clicks on the Line Chart Point |
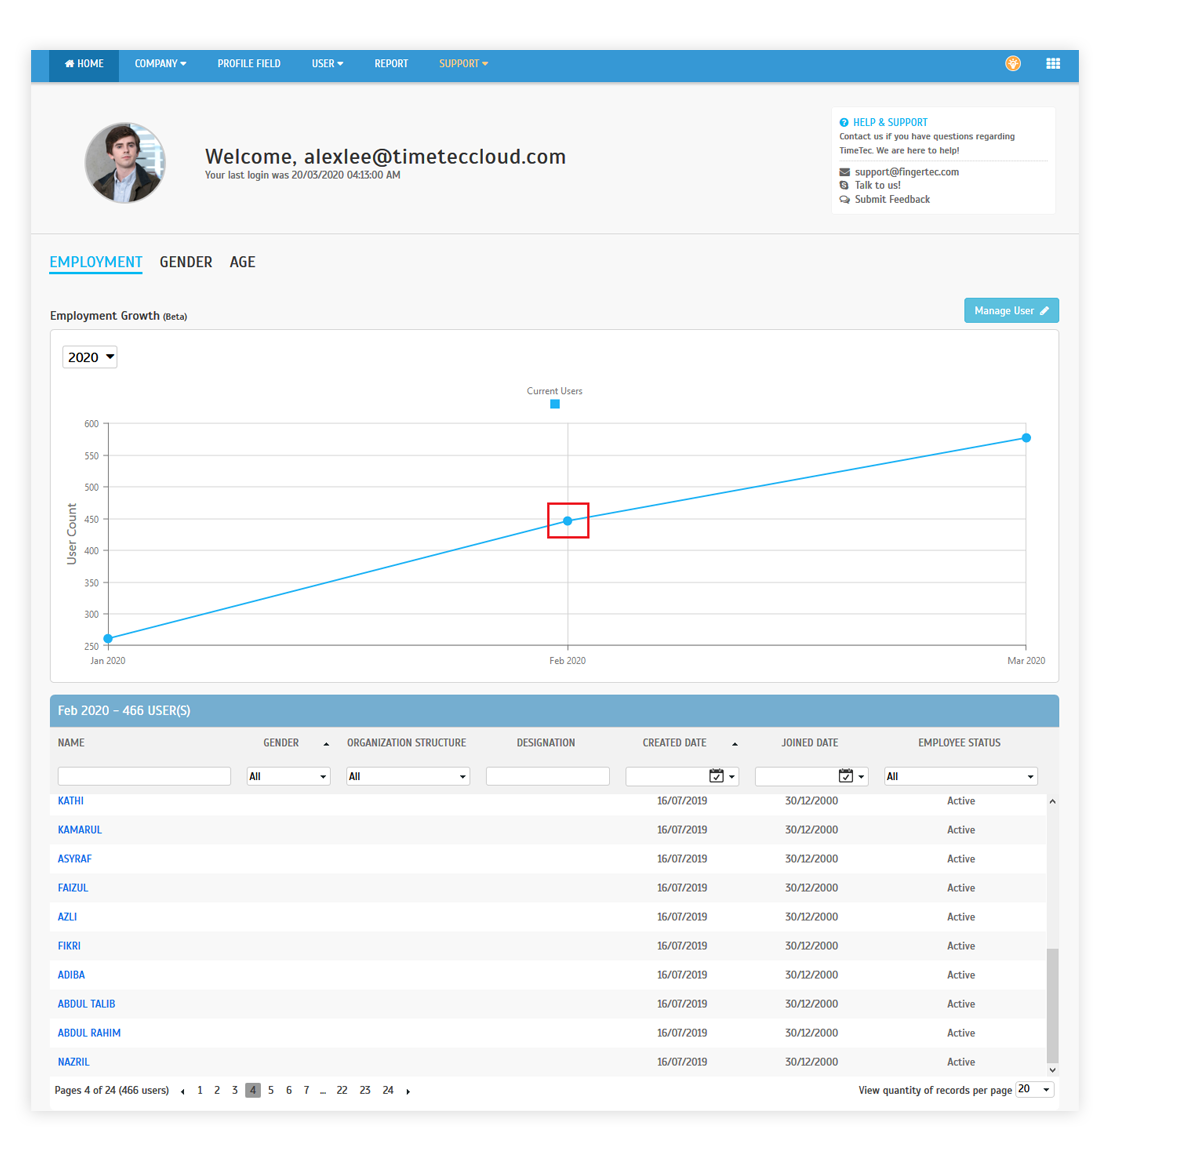 |
| d. Users can be Filtered |
 |
| TimeTec TA App Update |
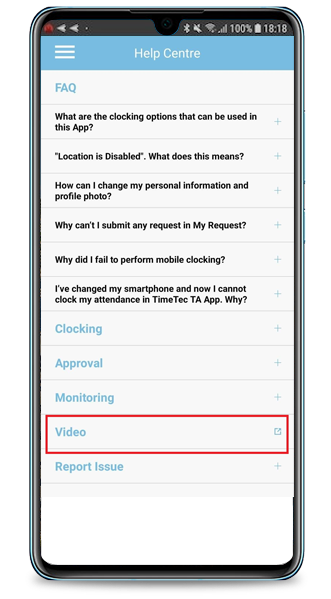
| 1. Help Centre |
| • Added a new Video section. |
 |
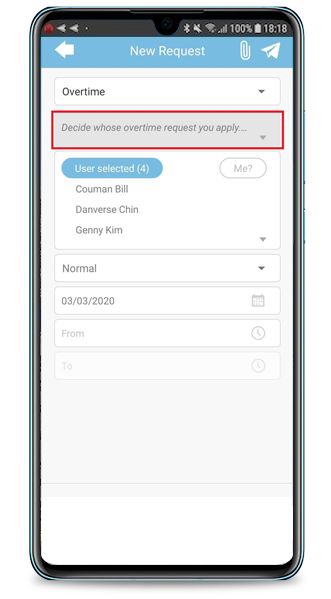
| 2. Approval |
| • Updated the display of description. |
  |
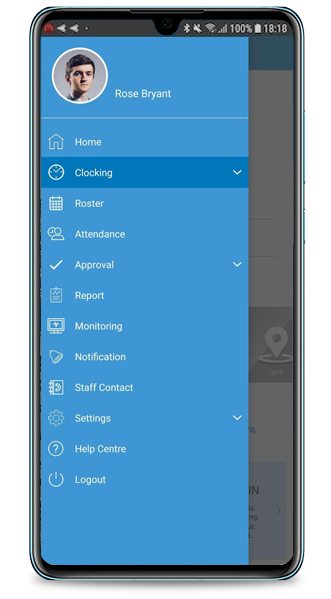
| 3. Side Menu |
| • Width adjustment. |
 |
| Previous Issue: Feb 2019 |
| Note: If some of the screenshots or steps viewed here are different from the ones in the current system, this is due to our continuous effort to improve our system from time to time. Please notify us at info@timeteccloud.com, we will update it as soon as possible. |
© 2020 Timetec Computing. All rights reserved.